Replace audio with cloned voices for consistent narration
Imagine watching or sharing your videos, but instead of the original low-quality audio, you hear your voice rendered in crystal-clear, studio-quality sound.A cloned voice can breathe new life into your videos and in this blog, I’ll show you how to build a Voice Replacement Agent in under 1 hour using Director.
VideoDB Director GitHub
Explore the complete Director framework and see real-world agent implementations
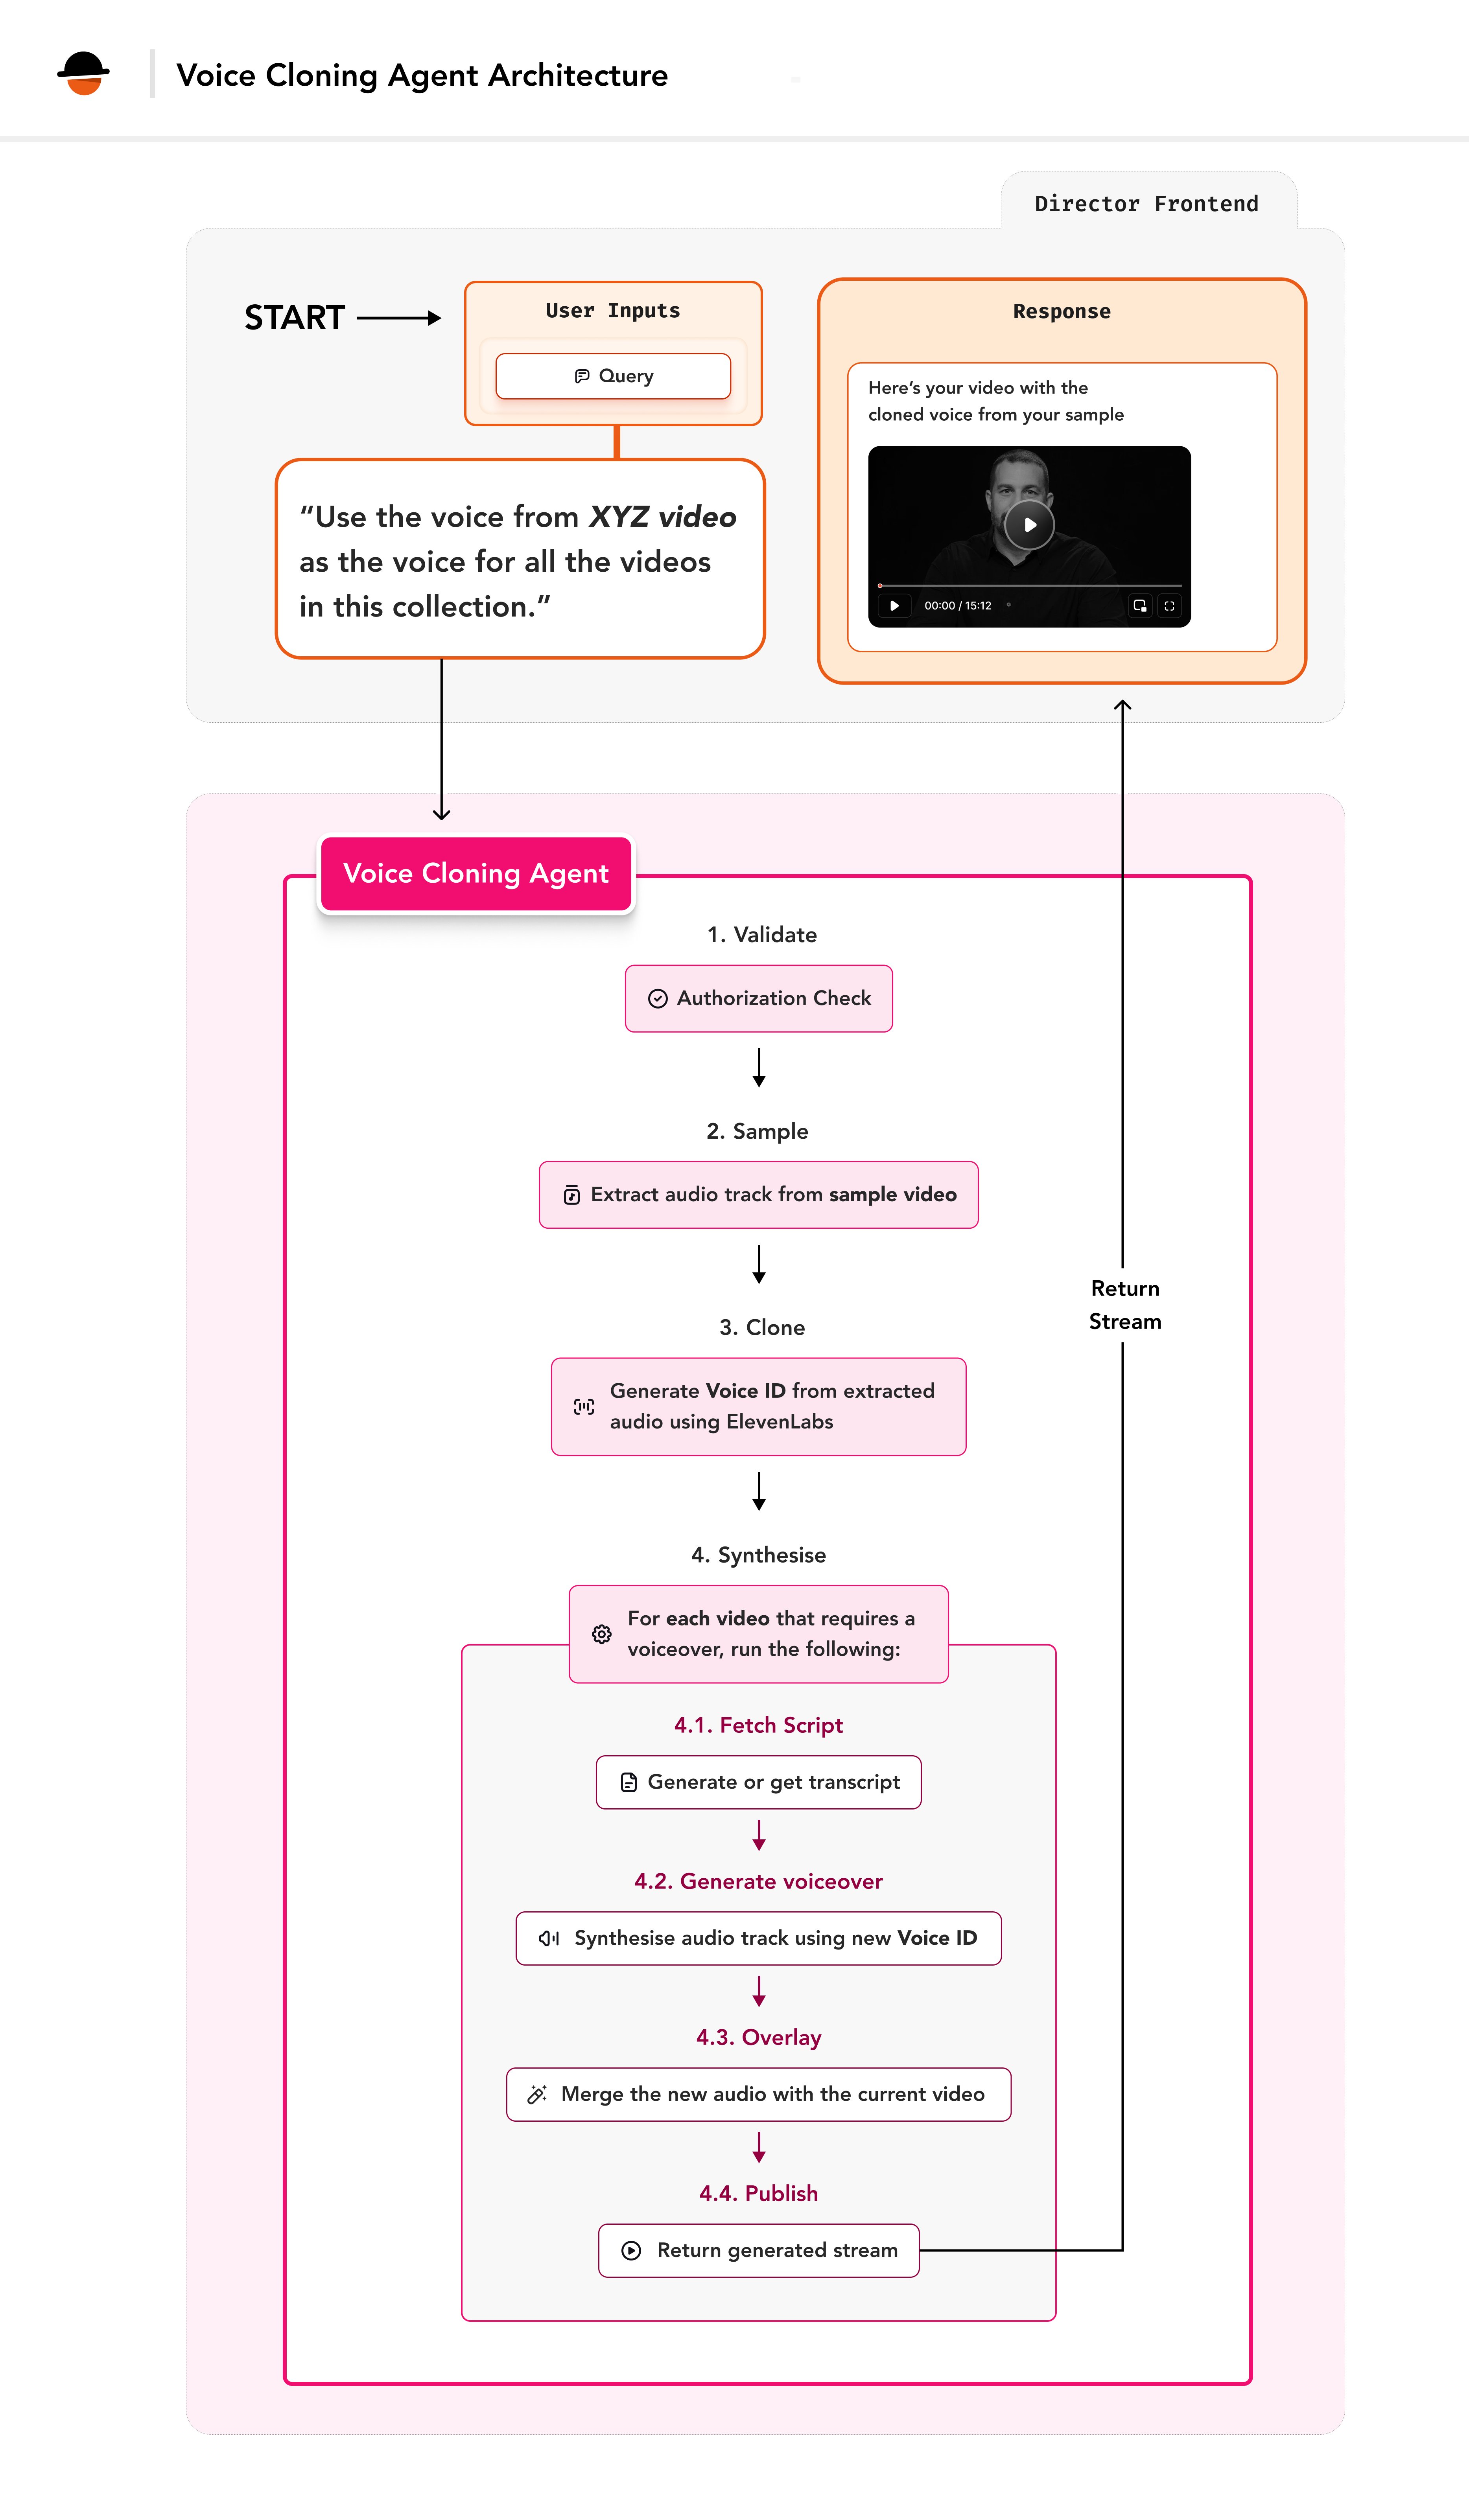
The Voice Replacement Agent is built on Director’s extensible framework, leveraging its session management and state tracking capabilities while adding specialised voice replacement functionality. This is how the flow from the user’s input to the video output will look like.
The following parameters will be needed for the agent. To learn more about the importance of an agent’s parameters, check out the Director documentation.
Parameter
Type of parameter
Description
sample_video
object
An object containing the video_id and start and end time for the sample length
name_of_voice
string
Name to assign to the cloned voice
description
string
Description of how the voice sounds (e.g., “elderly” or “child-like”, the accent etc.)
is_authorized_to_clone_voice
boolean
Flag indicating if the user is authorized to clone the voice
video_ids
list
List of Unique IDs given to the videos stored in VideoDB
collection_id
string
Collection ID for storing the generated audio
The collection_id parameter refers to the ID of a VideoDB collection where all your videos are stored and the generated (synthesised) audio file can be stored for future use. To learn more, explore VideoDB Collections documentation.
From ElevenLabs:You’ll need the following two key methods from the ElevenLabs SDK:
clone: Used to clone a voice based on the provided audio samples.
generate: Generates synthesised audio from text using the cloned voice.
You will need to implement these above methods in the VideoDB Director for the same.
For the voice cloning feature, the clone and generate methods given by ElevenLabs needs to be implemented. For this, you can access the existing ElevenLabs tool present in the /backend/director/toolsfolder. Lets go to the ElevenLabs tool in the elevenlabs.py.Define the required methods In the ElevenLabsTool.For cloning, create the clone_audio method
Referring to the Game Plan, create a JSON schema for these parameters.
Python
VOICE_REPLACEMENT_AGENT_PARAMETERS = { "type": "object", "properties": { "sample_video": { "type": "object", "properties": { "video_id": { "type": "string", "description": "The video id from which the 1 and a half minute sample audio has to be taken", }, "start_time": { "type": "number", "description": "The start time from where the 1 and a half minute. start time is given in seconds that is 1 minute 37 seconds is 97", "default": 0 }, "end_time": { "type": "number", "description": "The end time is where the extracted audio sample must end. Make sure that the end time is farther than start time and should only be 1 to 2 minutes farther than start_time. end time is given in seconds. for example 1 minute 37 seconds is 97", "default": 90 } } }, "name_of_voice" : { "type": "string", "description": "The name to give to the voice. This can be the user's name", }, "description" : { "type": "string", "description": "Description about how the voice sounds like. For example: This is a sounds of an old person, the voice is child like and cute etc." }, "is_authorized_to_clone_voice": { "type": "boolean", "description": "This is a flag to check if the user is authorised to clone the voice or not. If the user has explicitly mentioned that they are authorised to clone the voice, then the flag is TRUE else FALSE. Make sure to confirm that the user is authorised or not. If not specified explicitly or not specified at all, the flag should be FALSE" }, "cloned_voice_id": { "type": "string", "description": "This is the ID of the voice which is present if the user has already cloned a voice before. The cloned_voice_id can be taken from the previous results of cloning if the audio URL is not changed" }, "collection_id": { "type": "string", "description": "the ID of the collection to store the output audio file", }, "video_ids": { "type": "array", "items": { "type": "string" }, "description": "A list of IDs of videos which needs to be overlayed" } }, "required": ["sample_video", "is_authorized_to_clone_voice", "collection_id", "video_ids", "name_of_voice"],}
We will now create the agent class. The parameters set here ( self.agent_name, self.description and the self.parameters) determine how the agent interacts with the reasoning engine.
Python
class VoiceReplacementAgent(BaseAgent):
    def __init__(self, session: Session, **kwargs):
        self.agent_name = "voice_replacement"
        self.description = "This agent is used to clone the voice of the given by the user and overlay it on top of all the videos given. The user must be authorised to clone the voice. This agent can handle multiple agents at once"
        self.parameters = VOICE_REPLACEMENT_AGENT_PARAMETERS
        super().__init__(session=session, **kwargs)
4. Implement the core logic of the voice replacement agent
1. Declare a run methodWe will need to implement a run method in the agent’s class. This is the heart of the agent as this is the method that runs when the agent is called.In the run method, define the required parameters which will be used to implement the agent.
2. Check Authorisation: If the user isn’t authorised, return an error response
Python
# Inside the run method:try: if not is_authorised_to_clone_voice: return AgentResponse( status=AgentStatus.ERROR, message="Not authorised to clone the voice") # ... rest of implementation continues belowexcept Exception as e: pass # See error handling section later
3. Initialise Tools: Check for the ElevenLabs API key and initialise the required tools.
Python
ELEVENLABS_API_KEY = os.getenv("ELEVENLABS_API_KEY")if not ELEVENLABS_API_KEY: raise Exception("Elevenlabs API key not present in .env")audio_gen_tool = ElevenLabsTool(api_key=ELEVENLABS_API_KEY)self.videodb_tool = VideoDBTool(collection_id=collection_id)
4. Save the audio files locally: From the video stored in VideoDB, we will need to extract the required audio file. This can be broken into the following steps:
Generate a stream of the video for the sample based on start and end time of sample audio
Download the video based on the stream
Extract the audio file from the video
For generating the stream, we will use the existing get_video_stream method from the VideoDBTool :
Python
self.output_message.actions.append("Getting the sample video's stream")self.output_message.push_update()stream_url = self.videodb_tool.generate_video_stream(sample_video["video_id"], [(sample_video.get("start_time", 0),sample_video.get("end_time", 90))])
For downloading the video, first we will get the download link of the above generated stream
Python
self.output_message.actions.append("Getting the sample video's download URL")self.output_message.push_update()download_response = self.videodb_tool.download(stream_url)if download_response.get("status") == "done": download_url = download_response.get("download_url")else: raise Exception("Couldn't find the video download URL")
Now, we will write a _download_video_file method which will download the video via the download_url and give the path where it is saved
Python
def _download_video_file(self, video_url: str) -> str:
    os.makedirs(DOWNLOADS_PATH, exist_ok=True)

    try:
        response = requests.get(video_url, stream=True)
        response.raise_for_status()

        if not response.headers.get('Content-Type', '').startswith('video'):
            raise ValueError(f"The URL does not point to a video file: {video_url}")

        download_file_name = f"video_download_{uuid.uuid4()}.mp4"
        local_path = os.path.join(DOWNLOADS_PATH, download_file_name)

        with open(local_path, 'wb') as file:
            for chunk in response.iter_content(chunk_size=65536):
                print("Wrote chunk")
                file.write(chunk)

        print("Download finished")
        return local_path

    except Exception as e:
        print(f"Failed to download {video_url}: {e}")
        return None
Now, let’s use the method to get the video_path
Python
self.output_message.actions.append("Downloading the sample video")self.output_message.push_update()video_path = self._download_video_file(download_url)if not video_path: raise Exception("Couldn't fetch the video for sampling")
We will now extract the audio from a video using VideoDB. For this, we will need a extract_audio_from_video method.Start by defining a method _extract_audio_from_video, which takes a video file path as input and extracts audio from it.
Now, modify the existing get_audio method inside tools/videodb-tool.pyfile to include a url field in the returned object. This field provides a direct link to the extracted audio file.
Create the _download_audio_file method which will take the URL
Python
    def _download_audio_file(self, audio_url: str) -> str:

        os.makedirs(DOWNLOADS_PATH, exist_ok=True)

        try:
            response = requests.get(audio_url, stream=True)
            response.raise_for_status()

            download_file_name = f"audio_url_{str(uuid.uuid4())}.mp3"
            local_path = os.path.join(DOWNLOADS_PATH, download_file_name)

            with open(local_path, 'wb') as file:
                for chunk in response.iter_content(chunk_size=65536):
                    file.write(chunk)

            return local_path

        except Exception as e:
            logger.error(f"Failed to download {audio_url}: {e}")
            return None
Finally, let’s use this method to get the audio file from it
Python
sample_audio = self._extract_audio_from_video(video_path)if not sample_audio: return AgentResponse(status=AgentStatus.ERROR, message="Could'nt process the sample audios")
5. Clone the Voice: Call ElevenLabs’ clone_audio method to create the cloned voice.
Python
self.output_message.actions.append("Cloning the voice")self.output_message.push_update()voice = audio_gen_tool.clone_audio(audio_files=[sample_audio], name_of_voice=name_of_voice, description=description)if not voice: return AgentResponse( status=AgentStatus.ERROR, message="Failed to generate the voice clone")
6. Start processing all videos: We have generated the cloned voice and we can now create overlays for the videos. We will start processing the videos for each video_id present in the video_ids list
Python
for video_id in video_ids:
    video = self.videodb_tool.get_video(video_id=video_id)
7. Extract transcript from video: For the generation of audio for the video, we will need to extract the transcript from the video. For this, we will make a method in the agent which will take the video_id and return the transcript
8. Synthesise Text: Use ElevenLabs’ synthesise_text method to generate audio from the input text
Python
self.output_message.actions.append(f"Synthesising {video["name"]}'s transcript in cloned voice")self.output_message.push_update()synthesised_audio = audio_gen_tool.synthesis_text(voice=voice, text_to_synthesis=text_to_synthesis)if not synthesised_audio: return AgentResponse( status=AgentStatus.ERROR, message="Failed to generate the voice clone")
To communicate the steps that the agent is taking, you can simply use the self.output_message.actions and the self.output_message.push_update methods to send the updates to the client. This will allow you to communicate with the user about what the agent is achieving at a particular time.
9. Save the Audio File: Store the generated audio file locally
Python
output_file_name = f"audio_clone_voice_output_{str(uuid.uuid4())}.mp3"output_path = f"{DOWNLOADS_PATH}/{output_file_name}"with open(output_path, "wb") as f: for chunk in synthesised_audio: if chunk: f.write(chunk)self.output_message.actions.append( f"Generated audio saved at <i>{output_path}</i>")self.output_message.push_update()
10. Upload to VideoDB: We will upload the generated audio file to VideoDB and retrieve its unique audio ID.
Python
media = self.videodb_tool.upload( output_path, source_type="file_path", media_type="audio")self.output_message.actions.append( f"Uploaded generated audio to VideoDB with Audio ID {media['id']}")
11. Overlay audio on to the video: We will use VideoDB’s timeline feature to overlay the cloned voice onto the video.
To know more about timeline and audio overlays, you can visit the Audio overlay + Video + Timeline documentation.
For this, make a method for adding the overlay using the video_id and audio_id which returns a stream link so that we can stream the video.
Python
def _generate_overlay(self, video_id, audio_id):
    if self.timeline is None:
        return None

    self.timeline.add_inline(VideoAsset(video_id))
    self.timeline.add_overlay(start=0, asset=AudioAsset(audio_id))

    stream = self.timeline.generate_stream()
    return stream
Now, in the run method, before adding the overlay to the video, we will use VideoContent to display the video output in the Director’s UI to show that adding the audio overlay is in progress.
Python
video_content = VideoContent( status=MsgStatus.progress, status_message="Adding cloned voice to the video", agent_name=self.agent_name)self.output_message.content.append(video_content)self.output_message.push_update()
We will now add the overlay and pass the generated stream link to the video_content so that we can watch it in the Director’s UI.
Python
self.timeline = self.videodb_tool.get_and_set_timeline()stream_url = self._generate_overlay(video_id, audio_id=audio['id'])video_content.video = VideoData(stream_url=stream_url)video_content.status = MsgStatus.successvideo_content.status_message = "Here is your video with the cloned voice"self.output_message.push_update()
12. Publish the updates and return an AgentResponse to end the agent’s processOnce all the videos are processed, we will use the publish method to save the messages as a final step.
self.output_message.publish()
Also, you can send certain information such as the cloned_voice_id and audio_id as a response so that any subsequent chat requests will be able to use them to generate further responses.
# Exception handler for the try block above:try: pass # See implementation in previous sectionsexcept Exception as e: logger.exception(f"Error in {self.agent_name}") text_content = TextContent( agent_name=self.agent_name, status=MsgStatus.error, status_message="Failed to generate the transformed videos") self.output_message.content.append(text_content) self.output_message.push_update() self.output_message.publish() error_message = f"Agent failed with error {e}" return AgentResponse(status=AgentStatus.ERROR, message=error_message)
To use the agent, go inside the backend/director/handler.pyfile and import the agent.
Python
from director.agents.voice_replacement import VoiceReplacementAgent
And add the agent in the self.agents list
Python
class ChatHandler:
    def __init__(self, db, **kwargs):
        self.db = db

        # Register the agents here
        self.agents = [
            ...,
            VoiceReplacementAgent
        ]
And that is it! It was this straightforward to write an agent. Now you can try out this agent in the Director locally and explore the cloning capabilities of the ElevenLabs’ cloning feature and seamless video overlay feature from VideoDB to breathe new life into your videos!
The Voice Transformation Agent demonstrates the power and flexibility of Director’s agent framework. By leveraging VideoDB’s video overlay feature and robust database system and ElevenLabs’ voice cloning capabilities, we’ve created a secure, scalable solution for your voice cloning and video overlay needs.Key takeaways:
Simple integration with Director’s framework
Robust error handling and security measures
Scalable architecture for audio processing
Seamless way of adding audio overlays on videos
Ethical considerations built into the design
Creating an agent in VideoDB Director is incredibly easy, allowing you to build powerful and customised solutions quickly.