
Documentation Index

Fetch the complete documentation index at: https://docs.videodb.io/llms.txt

Use this file to discover all available pages before exploring further.

Desktop capture currently supports macOS and Windows.

1. Backend Setup

Install

pip install videodb

Create a Capture Session

Your backend creates a session and generates a short-lived token for the desktop client:
import videodb

conn = videodb.connect()

# Create session for a user
cap = conn.create_capture_session(
    end_user_id="user_abc",
    callback_url="https://your-backend.com/webhooks/videodb",
    metadata={"app": "my-ai-copilot"}
)

# Generate token for desktop client (never share API key)
token = conn.generate_client_token(expires_in=600)

# Send session ID and token to desktop client
print(f"Session: {cap.id}, Token: {token}")

2. Client Setup

Install

pip install "videodb[capture]"

Start Capture

The desktop client uses the token to stream screen and audio:
import asyncio
from videodb.capture import CaptureClient

async def capture(capture_session_id: str, client_token: str):
    client = CaptureClient(client_token=client_token)

    # Request permissions
    await client.request_permission("microphone")
    await client.request_permission("screen_capture")

    # Discover available sources
    channels = await client.list_channels()
    mic = channels.mics.default
    display = channels.displays.primary or channels.displays[1]
    system_audio = channels.system_audio.default
    selected = [c for c in [mic, display, system_audio] if c]

    # Start capture
    await client.start_session(
        capture_session_id=capture_session_id,
        channels=selected,
        primary_video_channel_id=display.name if display else None
    )

    # Listen for events
    async for ev in client.events():
        print(f"{ev.event}: {ev.payload}")
        if ev.event in ("recording-complete", "error"):
            break

    await client.stop_session()
    await client.shutdown()

# Run the capture
if __name__ == "__main__":
    asyncio.run(capture(
        capture_session_id="cap-xxx",  # From backend
        client_token="token-xxx"        # From backend
    ))

3. Backend Starts AI

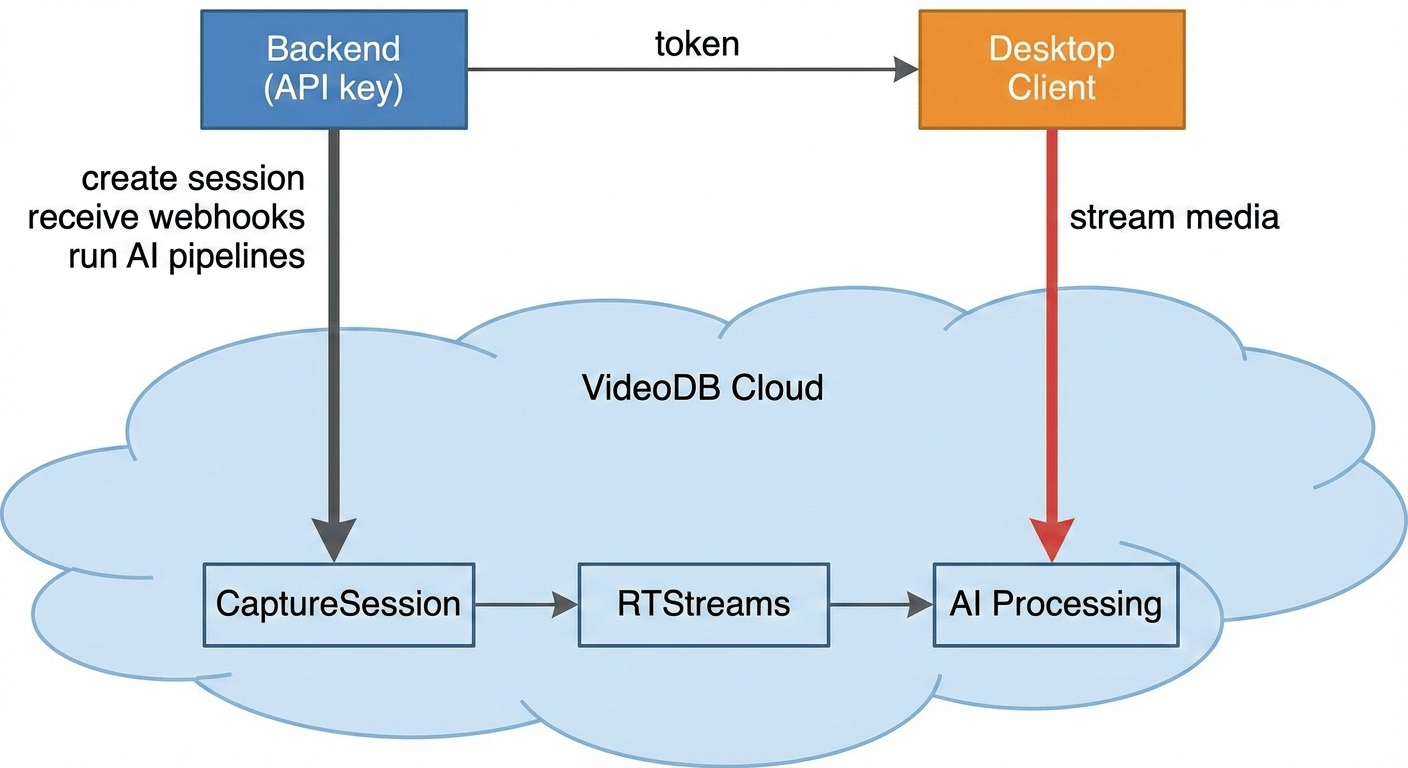
When capture begins, your backend receives a webhook and starts AI processing:
def on_webhook(payload: dict):
    if payload["event"] == "capture_session.active":
        cap_id = payload["capture_session_id"]
        cap = conn.get_capture_session(cap_id)

        # Get RTStreams (one per channel)
        mics = cap.get_rtstream("mic")
        displays = cap.get_rtstream("display")

        # Start real-time AI processing
        if mics:
            mic = mics[0]
            mic.start_transcript()
            mic.index_audio(prompt="Extract key decisions and action items")

        if displays:
            display = displays[0]
            display.index_visuals(prompt="Describe what the user is doing")

4. What You Get

Your backend receives AI-ready events in real-time:
{"type": "transcript", "text": "Let's schedule the meeting for Thursday", "is_final": true}
{"type": "index", "index_type": "visual", "text": "User is viewing a Slack conversation with 3 unread messages"}
{"type": "index", "index_type": "audio", "text": "Discussion about scheduling a team meeting"}
{"type": "alert", "label": "sensitive_content", "triggered": true, "confidence": 0.92}
Build with these:
  • Screen-aware AI agents
  • Live meeting copilots
  • In-call assistance
  • Semantic search and replay

Architecture

Diagram showing the architecture of the system
  1. Backend creates a CaptureSession and mints a short-lived token
  2. Desktop client uses the token to stream screen + audio (never sees API key)
  3. VideoDB creates RTStreams (one per channel) when capture starts
  4. Backend receives webhook, starts transcript and indexing on RTStreams
  5. AI events flow back via WebSocket (real-time) or can be polled

Two Runtimes

BackendDesktop Client
Holds API keyReceives session token
Creates sessionsCaptures media
Runs AI pipelinesStreams to VideoDB
Receives eventsEmits local UX events
Rule of thumb: Webhooks for correctness (durable, at-least-once). WebSocket for live UI (best-effort).

5. Example Applications

Claude Pair Programmer

AI coding assistant with screen and audio context

Bloom

Local-first screen recorder with AI indexing

Focusd

AI-powered productivity tracking

Call.md

Real-time meeting intelligence

6. Core Concepts

CaptureSession (cap-xxx)

The lifecycle container for one capture run. Created by backend, activated by desktop client. States: created → starting → active → stopping → stopped → exported

RTStream (rts-xxx)

A real-time media stream, one per captured channel. This is where you run AI:
rtstream.start_transcript()
rtstream.index_audio(prompt="Extract key decisions")
rtstream.index_visuals(prompt="Describe what user is doing")
rtstream.search("budget discussion")

Channel

A recordable source on the desktop:
ChannelDescription
mic:defaultDefault microphone
system_audio:defaultSystem audio output
display:1, display:2Connected displays

Multi-Screen Capture

When multiple monitors are connected, each appears as a separate display:N channel. Use cap.displays on the backend to inspect available video channels:
Python
cap = conn.get_capture_session("cap-xxx")

# List all video (display) channels
for d in cap.displays:
    print(f"{d.channel_id}  primary={d.is_primary}")
# display:1  primary=True
# display:2  primary=False
cap.displays returns a list of video channel objects. Each object includes an is_primary field that indicates which display was set as the primary video channel when capture started (via primary_video_channel_id). To capture multiple screens, pass all desired display channels to the desktop client:
Python
channels = await client.list_channels()

# Select both displays
display1 = channels.displays[1]   # display:1
display2 = channels.displays[2]   # display:2

await client.start_session(
    capture_session_id=cap_id,
    channels=[
        mic,
        display1,
        display2,
        system_audio,
    ],
    primary_video_channel_id=display1.name,
)
Each display produces its own RTStream on the backend. The primary display is used for the default muxed export video; non-primary displays are available as raw channel assets or can be exported separately (see Storage & Search).

Explore More

View All Examples on GitHub

Complete source code with quickstart guides, example apps, and implementation patterns

Real-time Context

Events you receive from capture

Storage & Search

Optional persistence and semantic search