> ## Documentation Index
> Fetch the complete documentation index at: https://docs.videodb.io/llms.txt
> Use this file to discover all available pages before exploring further.
# Capture SDK Overview
> Real-time desktop capture for AI agents - stream screen, microphone, and system audio
Desktop capture currently supports **macOS** and **Windows**.
## 1. Backend Setup
### Install
```bash theme={null}
pip install videodb
```
### Create a Capture Session
Your backend creates a session and generates a short-lived token for the desktop client:
```python Python theme={null}
import videodb
conn = videodb.connect()
# Create session for a user
cap = conn.create_capture_session(
end_user_id="user_abc",
callback_url="https://your-backend.com/webhooks/videodb",
metadata={"app": "my-ai-copilot"}
)
# Generate token for desktop client (never share API key)
token = conn.generate_client_token(expires_in=600)
# Send session ID and token to desktop client
print(f"Session: {cap.id}, Token: {token}")
```
```javascript Node.js theme={null}
import { connect } from 'videodb';
const conn = connect();
// Create session for a user
const cap = await conn.createCaptureSession({
endUserId: "user_abc",
callbackUrl: "https://your-backend.com/webhooks/videodb",
metadata: { app: "my-ai-copilot" }
});
// Generate token for desktop client (never share API key)
const token = await conn.generateClientToken(600);
// Send session ID and token to desktop client
console.log(`Session: ${cap.id}, Token: ${token}`);
```
***
## 2. Client Setup
### Install
```bash theme={null}
pip install "videodb[capture]"
```
### Start Capture
The desktop client uses the token to stream screen and audio:
```python Python theme={null}
import asyncio
from videodb.capture import CaptureClient
async def capture(capture_session_id: str, client_token: str):
client = CaptureClient(client_token=client_token)
# Request permissions
await client.request_permission("microphone")
await client.request_permission("screen_capture")
# Discover available sources
channels = await client.list_channels()
mic = channels.mics.default
display = channels.displays.primary or channels.displays[1]
system_audio = channels.system_audio.default
selected = [c for c in [mic, display, system_audio] if c]
# Start capture
await client.start_session(
capture_session_id=capture_session_id,
channels=selected,
primary_video_channel_id=display.name if display else None
)
# Listen for events
async for ev in client.events():
print(f"{ev.event}: {ev.payload}")
if ev.event in ("recording-complete", "error"):
break
await client.stop_session()
await client.shutdown()
# Run the capture
if __name__ == "__main__":
asyncio.run(capture(
capture_session_id="cap-xxx", # From backend
client_token="token-xxx" # From backend
))
```
```javascript Node.js theme={null}
import { CaptureClient } from 'videodb/capture';
async function capture(captureSessionId, clientToken) {
const client = new CaptureClient({ sessionToken: clientToken });
// Request permissions
await client.requestPermission('microphone');
await client.requestPermission('screen-capture');
// Discover available sources
const channels = await client.listChannels();
const mic = channels.find(c => c.channelId === 'mic:default');
const display = channels.find(c => c.channelId === 'display:1');
const systemAudio = channels.find(c => c.channelId === 'system_audio:default');
const selectedChannels = [mic, display, systemAudio]
.filter(Boolean)
.map(c => ({ channelId: c.channelId, type: c.type, record: true, store: true }));
// Start capture
await client.startCaptureSession({
sessionId: captureSessionId,
channels: selectedChannels
});
// Listen for events
client.on('transcript', (data) => console.log(`Transcript: ${data.text}`));
client.on('recording:stopped', () => client.shutdown());
}
// Run the capture
capture(
"cap-xxx", // From backend
"token-xxx" // From backend
);
```
***
## 3. Backend Starts AI
When capture begins, your backend receives a webhook and starts AI processing:
```python Python theme={null}
def on_webhook(payload: dict):
if payload["event"] == "capture_session.active":
cap_id = payload["capture_session_id"]
cap = conn.get_capture_session(cap_id)
# Get RTStreams (one per channel)
mics = cap.get_rtstream("mic")
displays = cap.get_rtstream("display")
# Start real-time AI processing
if mics:
mic = mics[0]
mic.start_transcript()
mic.index_audio(prompt="Extract key decisions and action items")
if displays:
display = displays[0]
display.index_visuals(prompt="Describe what the user is doing")
```
```javascript Node.js theme={null}
async function onWebhook(payload) {
if (payload.event === "capture_session.active") {
const capId = payload.capture_session_id;
const cap = await conn.getCaptureSession(capId);
// Get RTStreams
const mics = cap.getRtstream("mics");
const displays = cap.getRtstream("displays");
// Start real-time AI processing
if (mics?.length > 0) {
const mic = mics[0];
await mic.startTranscript();
await mic.indexAudio({ prompt: "Extract key decisions and action items" });
}
if (displays?.length > 0) {
const display = displays[0];
await display.indexVisuals({ prompt: "Describe what the user is doing" });
}
}
}
```
***
## 4. What You Get
Your backend receives AI-ready events in real-time:
```json theme={null}
{"type": "transcript", "text": "Let's schedule the meeting for Thursday", "is_final": true}
```
```json theme={null}
{"type": "index", "index_type": "visual", "text": "User is viewing a Slack conversation with 3 unread messages"}
```
```json theme={null}
{"type": "index", "index_type": "audio", "text": "Discussion about scheduling a team meeting"}
```
```json theme={null}
{"type": "alert", "label": "sensitive_content", "triggered": true, "confidence": 0.92}
```
**Build with these:**
* Screen-aware AI agents
* Live meeting copilots
* In-call assistance
* Semantic search and replay
### Architecture
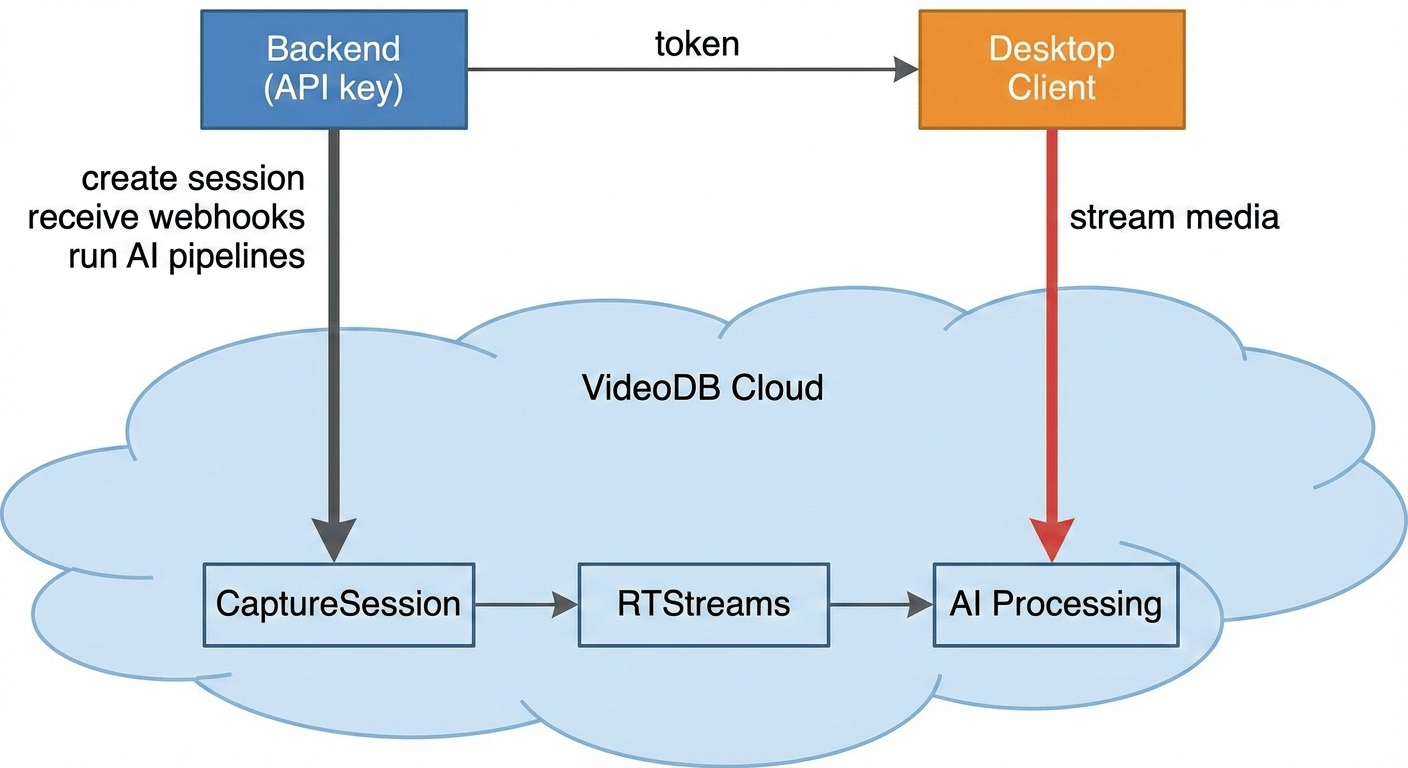 1. **Backend** creates a CaptureSession and mints a short-lived token
2. **Desktop client** uses the token to stream screen + audio (never sees API key)
3. **VideoDB** creates RTStreams (one per channel) when capture starts
4. **Backend** receives webhook, starts transcript and indexing on RTStreams
5. **AI events** flow back via WebSocket (real-time) or can be polled
### Two Runtimes
| Backend | Desktop Client |
| :---------------- | :--------------------- |
| Holds API key | Receives session token |
| Creates sessions | Captures media |
| Runs AI pipelines | Streams to VideoDB |
| Receives events | Emits local UX events |
**Rule of thumb:** Webhooks for correctness (durable, at-least-once). WebSocket for live UI (best-effort).
***
## 5. Example Applications
AI coding assistant with screen and audio context
Local-first screen recorder with AI indexing
AI-powered productivity tracking
Real-time meeting intelligence
***
## 6. Core Concepts
### CaptureSession (cap-xxx)
The lifecycle container for one capture run. Created by backend, activated by desktop client.
**States:** `created → starting → active → stopping → stopped → exported`
### RTStream (rts-xxx)
A real-time media stream, one per captured channel. This is where you run AI:
```python Python theme={null}
rtstream.start_transcript()
rtstream.index_audio(prompt="Extract key decisions")
rtstream.index_visuals(prompt="Describe what user is doing")
rtstream.search("budget discussion")
```
```javascript Node.js theme={null}
await rtstream.startTranscript();
await rtstream.indexAudio({ prompt: "Extract key decisions" });
await rtstream.indexVisuals({ prompt: "Describe what user is doing" });
await rtstream.search({ query: "budget discussion" });
```
### Channel
A recordable source on the desktop:
| Channel | Description |
| :----------------------- | :------------------ |
| `mic:default` | Default microphone |
| `system_audio:default` | System audio output |
| `display:1`, `display:2` | Connected displays |
### Multi-Screen Capture
When multiple monitors are connected, each appears as a separate `display:N` channel. Use `cap.displays` on the backend to inspect available video channels:
```python Python theme={null}
cap = conn.get_capture_session("cap-xxx")
# List all video (display) channels
for d in cap.displays:
print(f"{d.channel_id} primary={d.is_primary}")
# display:1 primary=True
# display:2 primary=False
```
`cap.displays` returns a list of video channel objects. Each object includes an `is_primary` field that indicates which display was set as the primary video channel when capture started (via `primary_video_channel_id`).
To capture multiple screens, pass all desired display channels to the desktop client:
```python Python theme={null}
channels = await client.list_channels()
# Select both displays
display1 = channels.displays[1] # display:1
display2 = channels.displays[2] # display:2
await client.start_session(
capture_session_id=cap_id,
channels=[
mic,
display1,
display2,
system_audio,
],
primary_video_channel_id=display1.name,
)
```
Each display produces its own RTStream on the backend. The primary display is used for the default muxed export video; non-primary displays are available as raw channel assets or can be exported separately (see [Storage & Search](/pages/ingest/capture-sdks/storage-and-search)).
***
## Explore More
Complete source code with quickstart guides, example apps, and implementation patterns
Events you receive from capture
Optional persistence and semantic search
1. **Backend** creates a CaptureSession and mints a short-lived token
2. **Desktop client** uses the token to stream screen + audio (never sees API key)
3. **VideoDB** creates RTStreams (one per channel) when capture starts
4. **Backend** receives webhook, starts transcript and indexing on RTStreams
5. **AI events** flow back via WebSocket (real-time) or can be polled
### Two Runtimes
| Backend | Desktop Client |
| :---------------- | :--------------------- |
| Holds API key | Receives session token |
| Creates sessions | Captures media |
| Runs AI pipelines | Streams to VideoDB |
| Receives events | Emits local UX events |
**Rule of thumb:** Webhooks for correctness (durable, at-least-once). WebSocket for live UI (best-effort).
***
## 5. Example Applications
AI coding assistant with screen and audio context
Local-first screen recorder with AI indexing
AI-powered productivity tracking
Real-time meeting intelligence
***
## 6. Core Concepts
### CaptureSession (cap-xxx)
The lifecycle container for one capture run. Created by backend, activated by desktop client.
**States:** `created → starting → active → stopping → stopped → exported`
### RTStream (rts-xxx)
A real-time media stream, one per captured channel. This is where you run AI:
```python Python theme={null}
rtstream.start_transcript()
rtstream.index_audio(prompt="Extract key decisions")
rtstream.index_visuals(prompt="Describe what user is doing")
rtstream.search("budget discussion")
```
```javascript Node.js theme={null}
await rtstream.startTranscript();
await rtstream.indexAudio({ prompt: "Extract key decisions" });
await rtstream.indexVisuals({ prompt: "Describe what user is doing" });
await rtstream.search({ query: "budget discussion" });
```
### Channel
A recordable source on the desktop:
| Channel | Description |
| :----------------------- | :------------------ |
| `mic:default` | Default microphone |
| `system_audio:default` | System audio output |
| `display:1`, `display:2` | Connected displays |
### Multi-Screen Capture
When multiple monitors are connected, each appears as a separate `display:N` channel. Use `cap.displays` on the backend to inspect available video channels:
```python Python theme={null}
cap = conn.get_capture_session("cap-xxx")
# List all video (display) channels
for d in cap.displays:
print(f"{d.channel_id} primary={d.is_primary}")
# display:1 primary=True
# display:2 primary=False
```
`cap.displays` returns a list of video channel objects. Each object includes an `is_primary` field that indicates which display was set as the primary video channel when capture started (via `primary_video_channel_id`).
To capture multiple screens, pass all desired display channels to the desktop client:
```python Python theme={null}
channels = await client.list_channels()
# Select both displays
display1 = channels.displays[1] # display:1
display2 = channels.displays[2] # display:2
await client.start_session(
capture_session_id=cap_id,
channels=[
mic,
display1,
display2,
system_audio,
],
primary_video_channel_id=display1.name,
)
```
Each display produces its own RTStream on the backend. The primary display is used for the default muxed export video; non-primary displays are available as raw channel assets or can be exported separately (see [Storage & Search](/pages/ingest/capture-sdks/storage-and-search)).
***
## Explore More
Complete source code with quickstart guides, example apps, and implementation patterns
Events you receive from capture
Optional persistence and semantic search